Karl Franz Cup 2 Game 3 Warhammer Fantasy 8th Battle report
The final game of the Karl Franz Cup 2 was a doubles game with 4 players on 1 table. I was playing with my partner for the event, Kobayashi-san and his Ogres. He had a BSB, a butcher, 6 bulls, 6 iron guts, 4 leadbealchers, 3 mournfang cavalry, 2 sabre tusks and an iron blaster. I felt they would add some muscle to my flimsy elves.
We faced Rodion and Aki who had High elves and Empire respectively. Rodion's High elves were all cavalry with 4 units of Ellyrian Reavers and then 10 or so Dragon Princes led by a mage a BSB and a frost heart phoenix. The Empire were a traditional style list with 2 blocks of halberdiers, a few hand gunners, some knights, pistoleers a general, BSB, warrior priest, wizard and a cannon.
It was the Meeting Engagement scenario and the empire pistoleers and 1 block of halberdiers started off the table as well as my archers. The high elves/empire deployment was focused on the centre and deep on the left side of the table and looked quite spacious. With so many big monsters our side was crowded, with all 3 monsters and the iron blaster hiding behind a hill to avoid a first turn cannon shot.
The empire/elves went first.

Turn 1
1 unit of reavers moved around our left and another went to the right. The rest of the army moved up a little, but were weary of being charged so kept a good distance. The High elf arch mage failed his first spell and that was the end of the magic phase. The reavers killed a sabre tusk on the far left and I passed the panic test for my silver hems next to it. If I had failed they would have fled through another 6 units and could of panicked half our army. The rest of the shooting did a couple of wounds to the ogres and the cannon fell short of the white lions.
 |
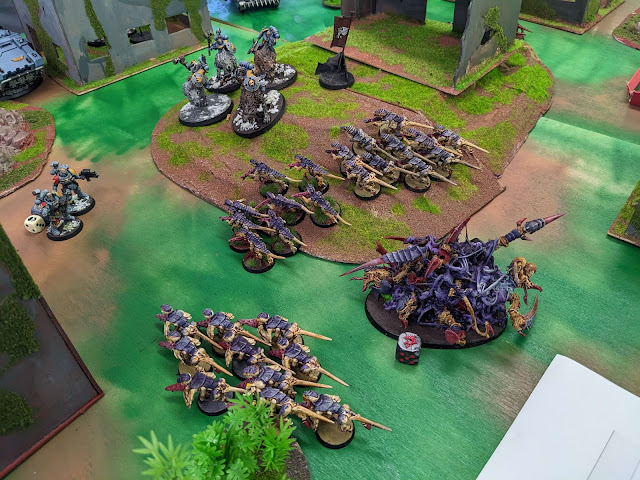
| The frost phoenix is the wrong colour, it should be blue not white. |
On our turn 1 the phoenix bombed all 5 reavers on the left and the army moved up aggressively, but avoided the charges of their best units. In the magic phase the dragon mage miscast a fire ball, doing 1 wound to the cannon and 1 wound to his dragon. A couple of reavers from 2 units were killed by shooting and then the iron blaster removed the enemy cannon, doing 2 wounds, just enough after the earlier fireball. With the cannon gone, the monsters could relax.

Turn 2
The empire/elves pivoted their army to the left side of the board, with 1 unit of halberdiers charging the sabre tusk that had moved up to threaten the now dead cannon. Again they mostly avoided our charges, but the dragon princes seemed confident and left their rear open to my griffon and prince.

In the magic phase the archmage miscast a spell, and managed to loose a wizard level. That was the end of the phase. Shooting did more wounds to the ogres and the sabre tusk was cut down in combat.
In our turn the mournfang cavalry charged the halberdiers, 1 unit of silver helms went into the enemy knights and my prince went into the rear of the dragon princes. The dragon mage killed 2 pistoleers with a fireball and the archers/lead belchers tried to hurt the frost heart phoenix.


The mournfang smashed large numbers of halberdiers, as wells as the priest and BSB, but they held due to steadfast. My lord was challenged by the BSB and did nothing, he was wounded in return, lost by 1 but held. My 3 silver helms, may have killed a knight, probably lost, but held.
Turn 3
My lord was flank charged by the other halberdier block and the other units manoeuvred with 2 reavers blocking the bulls. The arch mage cast 1 spell giving him and the bsb a 3 up ward save. In combat the prince wounded the BSB, who then killed the prince. The griffon then avenged its master and ate the BSB. The Griffon lost and then fled and was run down by the knights and halberdier block. Meanwhile the mournfang cavalry reduced the halberdier to 4 men, who fled. The mournfang passed their Ld 7 test to not chase and reformed .

Up until now the game was quite close but suddenly that Ld 7 test had changed the game. The mournfang now had a straight line to the flanks of dragon prince/archmage unit, and the other halberdier unit with wizard beyond them.

In our turn the mournfang went into the dragon princes, and the silver hems went into the halberiders. The bulls mashed the reavers and turned around to face the frost heart phoenix.
The dragon mage miscast again and killed himself and the dragon became stupid. The frost heart dodged another iron blaster shot.
Then came the main combat. The mournfang smashed the dragon princes leaving just the champion and archmage who fled. The mournfang then overran into the halberdiers and fought again as the silver helms had also charged in and had not started the fight. The unit was wiped out and the centre of the enemy had been destroyed. Also, thanks to his loyal body guard the archmage needed double 1s to rally, and so would flee the field by turn 6, along with the 4 halberdiers from the first unit.

The rest of the game
The game was now over, but over the next 3 turns a few interesting things happened.
My phoenix charged the rear of the empire knights, who were already fighting my white lions, did nothing, fled, escaped, failed to rally and was then chased off the field.
 |
| The heroic reavers are in the center. |
The frost heart survived to the end, fighting both units of ogres
My dragon failed every stupidity test, doing a little parade in front of the hand gunners who eventually killed it on turn 6
2 reavers had the most glorious turn I have ever seen. They rear charged 5 silver helms, took no damage, killed 1 and then ran them down. Then they were charged by my other 2 silver helms. The reavers did a stand and shoot reaction, 2 hits, 2 wounds and 2 1s for my saves and the silver helms were no more. Their demise then panicked the iron blaster from the table.
In the end we had lost almost all the elves, just the archers remained, but almost all the ogres were still standing. Only the iron blaster and sabre tusks were gone. The enemy had lost everything except the phoenix, 1 unit of reavers, the empire general, his knights and 10 hand gunners. Given the extra points for 2 BSBs, 1 general and 3 banners, it was a sold win which was mostly due to Kobayashi-san and his ogres.
In the end my team came second when ranking for painting, gaming and sportsmanship were worked out. I missed out on all the individual trophies coming 2nd in ever category.


Comments
Post a Comment